Follow Me On Social Media!
How to Make Pinwheel Cookies: The Best Fun Twist on Classics
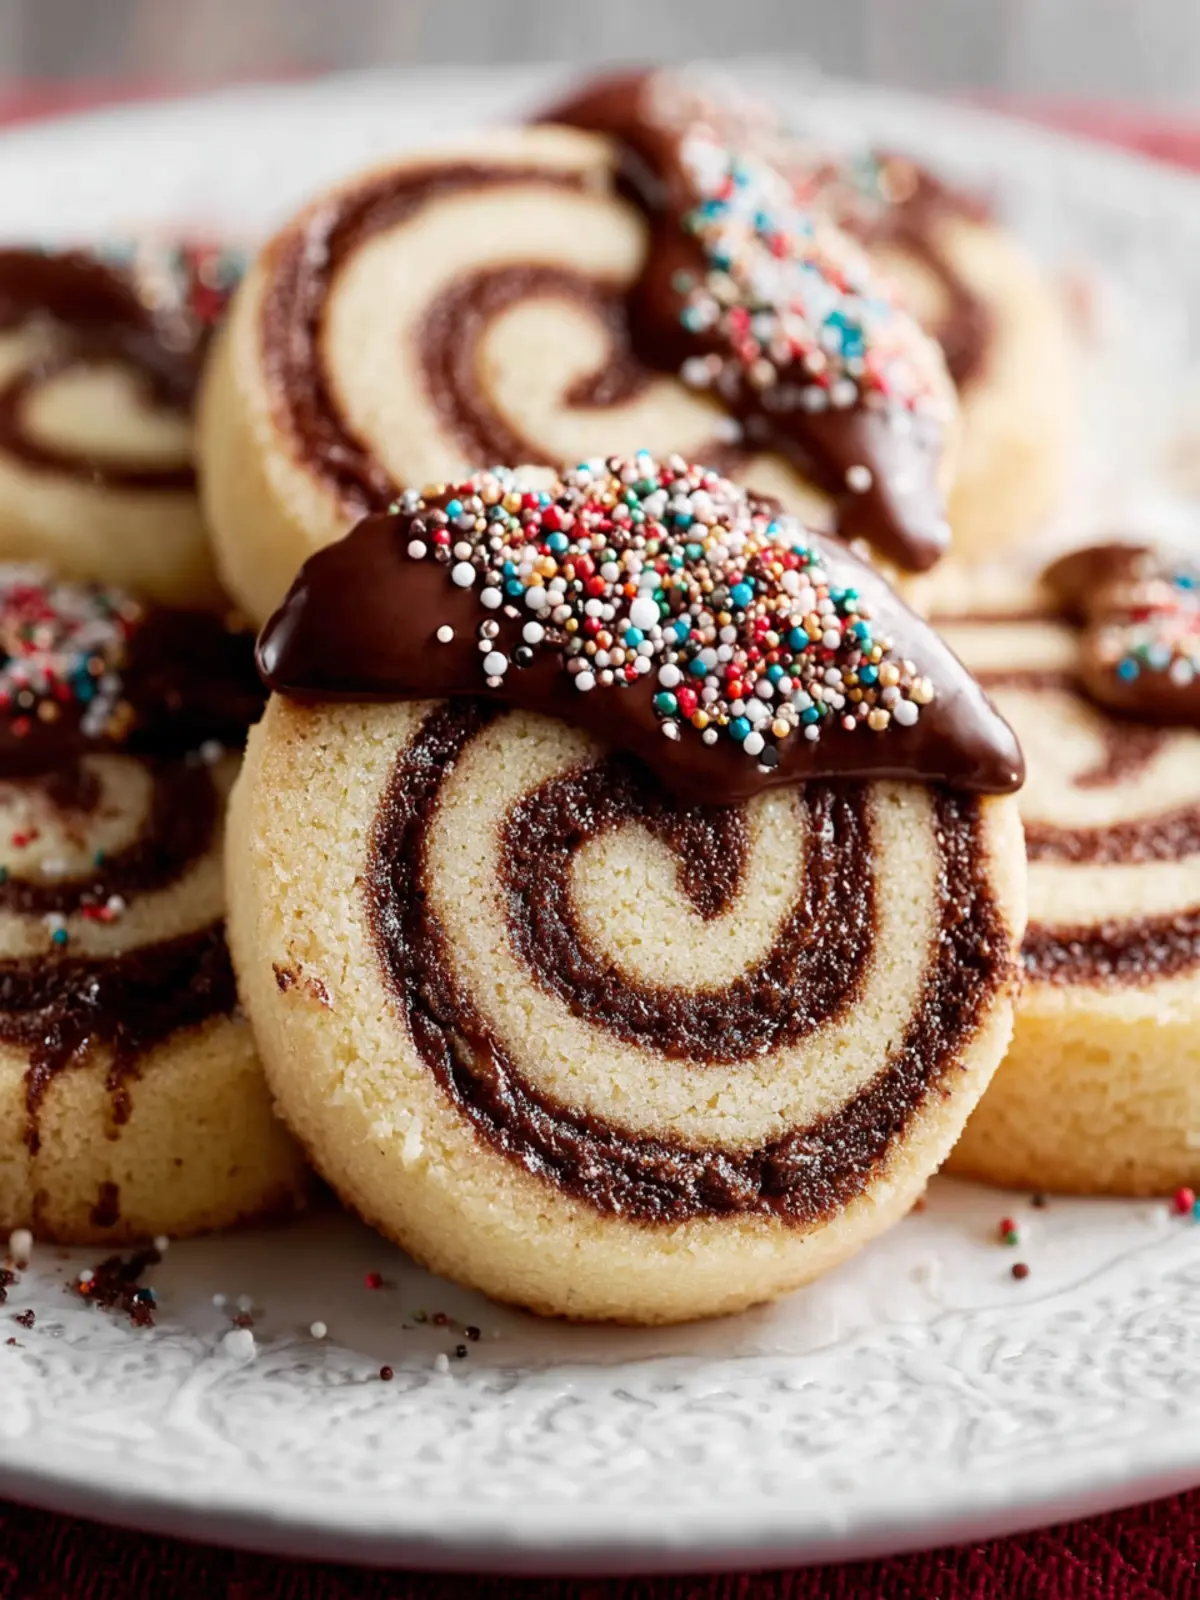
Introduction to Pinwheel Cookies
Imagine a delightful swirl of colors and flavors melting in your mouth with each bite—that’s exactly what you can expect from pinwheel cookies. The sheer visual appeal of these cookies, combined with their rich, buttery texture and delicious flavor combinations, makes them a perennial favorite for cookie lovers everywhere. Whether you’re hosting a gathering or just looking for a way to indulge your sweet tooth, learning how to make pinwheel cookies will become a cherished part of your baking repertoire.
What Makes Pinwheel Cookies a Delightful Treat?
Pinwheel cookies are not just your average dessert; they are a canvas for creativity. These delightful treats layer two different flavored doughs together, rolled up into a log, sliced, and baked to perfection. What sets them apart is their vibrant presentation, which showcases beautiful swirls of color. Imagine biting into a tender cookie that tastes like chocolate and vanilla in perfect harmony. Here are a few reasons why pinwheel cookies deserve a spot in your baking rotation:
-
Versatile Flavor Combinations: From classic chocolate and vanilla to adventurous red velvet with cream cheese, the flavor possibilities are endless. Customize them to match your mood or season—think pumpkin for autumn or mint for the holidays.
-
Impressive Presentation: The striking spiral pattern not only catches the eye but is also a fantastic way to impress guests or family. You’ll feel like a baking superstar when you serve these beauties on a platter.
-
Fun to Make: Rolling the dough is a gratifying process, and you can involve friends or family in creating their unique versions. It’s a simple way to connect and enjoy some quality time in the kitchen.
-
Ideal for Any Occasion: Whether you’re celebrating a birthday, holiday, or a casual get-together, pinwheel cookies adapt to any event. They’re perfect for gifting too; who wouldn’t appreciate a box of homemade cookies?
By mastering how to make pinwheel cookies, you’ll not only create a delicious treat but also memories that will last long after the last cookie is gone. So let’s dive into the fun of making these whimsical delights!

Key Ingredients for Pinwheel Cookies
Pinwheel cookies are a delightful treat that not only taste amazing but also present beautifully. The key ingredients for this recipe come together to create a swirl of flavors that your friends and family will adore.
-
Butter: Using unsalted butter is essential for achieving that rich, creamy base in our cookie dough. It not only enriches the flavor but also ensures the perfect texture—crumbly yet supple.
-
Sugar: Granulated sugar adds sweetness while helping the cookies to spread just right during baking. For a hint of caramel glow, consider a little light brown sugar mixed in!
-
Flour: All-purpose flour is the backbone of this recipe. It provides the necessary structure, ensuring each bite maintains its shape without crumbling apart.
-
Cocoa Powder: For those enticing chocolate swirls, unsweetened cocoa powder is a must. It lends a deep, rich flavor that beautifully contrasts with the vanilla dough.
-
Eggs: Eggs act as a binder, ensuring your cookie dough stays together. They also contribute to the overall moisture, creating that soft, chewy interior that everyone loves.
-
Vanilla Extract: A splash of pure vanilla extract amplifies the flavors of both the chocolate and the dough, making each bite a burst of aromatic joy.
With these ingredients, you’re well-equipped to embark on your journey of how to make pinwheel cookies. Get ready to impress everyone with these delightful treats!
Why You’ll Love These Pinwheel Cookies
Pinwheel cookies are not just a treat; they tell a story. Imagine baking in your cozy kitchen, the scent of vanilla wafting through the air as you roll and swirl together flavors to create these vibrant cookies. What’s not to love about an indulgence that combines a playful appearance with delightful taste?
Visual Appeal
One of the best parts about pinwheel cookies is their eye-catching design. The beautiful spirals of color make them perfect for any occasion, from festive gatherings to casual snack breaks. They stand out on a dessert platter, inviting everyone to take a bite.
Easy to Make
Learning how to make pinwheel cookies is straightforward and fun. The process allows you to get creative with different color combinations and flavors, whether you stick with classic vanilla and chocolate or explore with matcha and berry options. It’s a fantastic way to involve friends or family in baking, turning it into a memorable experience.
Perfect for Sharing
Pinwheel cookies also make great gifts! Their unique appearance and delicious flavor are sure to impress anyone who receives them. Plus, you can easily package them in a festive box or tin, making them a thoughtful homemade present.
So, as you embark on this delightful baking journey, you’ll find that these pinwheel cookies aren’t just about indulgence; they’re also about sharing joy, creativity, and delicious flavors with those you love.

Tips for Making Perfect Pinwheel Cookies
Creating perfect pinwheel cookies isn’t as daunting as it might seem. With a little patience and attention to detail, you’ll have a batch that looks as good as they taste. Here are some tips to elevate your pinwheel cookie game:
Choose Quality Ingredients
The key to any great cookie lies in using fresh, high-quality ingredients. Opt for unsalted butter, as it gives you control over the salt content. Don’t skimp on the vanilla extract; choose pure vanilla for the most authentic flavor. And if you’re feeling adventurous, consider incorporating different flavored extracts to make unique combinations.
Pay Attention to Dough Temperature
Make sure your dough is well-chilled before rolling. A cooler dough is easier to handle and prevents the colors from blending during the rolling process. If your dough feels too soft, pop it in the fridge for about 30 minutes before shaping.
Roll Carefully, Slice Precisely
When rolling your cookie dough, aim for even thickness—about 1/4 inch works best. The more uniform your roll, the better your cookies will look once sliced. Use a sharp knife or a bench scraper for clean cuts, revealing those beautiful pinwheel layers.
Experiment with Fillings
While the classic chocolate and vanilla combo is delicious, don’t hesitate to try other fillings. Adding things like peppermint extract, cocoa powder, or even zest from citrus fruits can transform your cookies, making them a delightful surprise.
By following these tips, you’re not just learning how to make pinwheel cookies; you’re mastering the art of cookie-making!
Time Details for Pinwheel Cookies
Making pinwheel cookies is a delightful baking adventure that’s well worth your time! Here’s a breakdown of the time you’ll need to whip up these colorful treats:
-
Preparation time: Expect to spend around 30 minutes mixing and rolling the dough. This initial step is where the magic starts, as you create the vibrant layers.
-
Chilling time: It’s crucial to chill the dough for at least 1 hour. This step solidifies the butter and helps maintain those beautiful swirls when sliced.
-
Baking time: Baking will take about 10-12 minutes at 350°F (175°C). Keep an eye on them; they should be lightly golden around the edges.
-
Total time: All in all, you’re looking at approximately 1 hour and 50 minutes from start to finish if you include chilling time. But trust me, the wait is worth it when you bite into these deliciously pretty cookies!

Nutritional Information for Pinwheel Cookies
When you’re mastering the art of how to make pinwheel cookies, it’s not just about the delightful flavors; understanding the nutritional content can help you enjoy them even more mindfully. Each cookie is a delicious treat, but knowing what fuels your body is just as important!
Calories
A single pinwheel cookie typically contains around 120 calories. The fun swirl of flavors can be a delightful indulgence in moderation.
Protein
While they’re not a significant source of protein, each cookie offers about 1.5 grams. Pairing these cookies with a glass of milk can boost your protein intake and make a charming midday snack!
Sodium
Each cookie has approximately 60 mg of sodium. This keeps things in check, making them a good option for a sweet bite without overwhelming your daily sodium intake.
Enjoy these cookies and savor every bite, knowing you’ve made a treat that’s not only delicious but also fits into a balanced lifestyle!
FAQs about Pinwheel Cookies
If you’ve ever found yourself daydreaming about pinwheel cookies, you’re not alone. The captivating swirls of flavors in each bite are impossible to resist, making them a favorite for gatherings or quiet evenings at home. But as with any favorite recipe, questions can arise. Here’s a handy FAQ section to help you navigate your baking journey.
Can I make the dough ahead of time?
Absolutely! One of the great things about learning how to make pinwheel cookies is the flexibility it offers. You can prepare your dough a day or two in advance. Simply wrap it tightly in plastic wrap and refrigerate it. This not only saves time on baking day but allows the flavors to meld beautifully while chilling. When you’re ready to bake, just slice and pop them in the oven.
What other flavor variations can I try?
The beauty of pinwheel cookies lies in their versatility. While chocolate and vanilla are classics, why not get adventurous? Here are a few ideas:
- Red Velvet: Incorporate cocoa and a bit of red food coloring for a festive twist.
- Coffee: Add instant coffee granules to your dough for a caffeine kick.
- Citrus: Fresh lemon or orange zest can brighten the flavors of your cookies.
Feel free to mix and match! This is where creativity shines.
How do I store leftover pinwheel cookies?
Keeping your delicious pinwheel cookies fresh isn’t difficult at all. Simply store them in an airtight container at room temperature for up to a week. If you want to keep them longer, consider freezing them. Layer the cookies between sheets of parchment paper in a freezer-safe container. They’ll be ready for snacking whenever the craving hits!
With these tips, you’ll be well on your way to mastering how to make pinwheel cookies and enjoying delightful variations for every occasion. Happy baking!
Conclusion on Pinwheel Cookies
Creating pinwheel cookies is a delightful journey that brings a touch of whimsy to your baking. Each swirl offers a surprise of flavors, making them perfect for any occasion, from cozy family gatherings to festive celebrations. Remember, the beauty of these cookies lies not just in their appearance but in the joy they bring when shared.
By following the recipe and tips provided, you’ll master the art of how to make pinwheel cookies that are not only visually stunning but also melt-in-your-mouth delicious. So, preheat that oven, roll out the dough, and let the magic happen—your taste buds will thank you!
Print
Chocolate Swirl Cookies
- Total Time: 1 hour 15 minutes
- Yield: 28 cookies 1x
Description
These delicious chocolate swirl cookies combine rich vanilla and chocolate flavors in a delightful treat perfect for any occasion.
Ingredients
Scale
- 2 and 2/3 cups all-purpose flour (spooned & leveled)
- 3/4 teaspoon baking powder
- 1/2 teaspoon salt
- 1 cup unsalted butter, softened to room temperature (16 Tbsp; 226g)
- 1 cup granulated sugar (200g)
- 1 large egg, at room temperature
- 1 egg yolk, at room temperature
- 1 and 1/2 teaspoons pure vanilla extract
- 2 Tablespoons unsweetened natural or dutch-process cocoa powder (10g)
- 1 Tablespoon milk (15ml)
- 1/2 teaspoon espresso powder (optional)
- 6 ounces white, semi-sweet, or dark chocolate, finely chopped (170g; see Note)
- optional: sprinkles
Instructions
- Whisk the flour, baking powder, and salt together in a medium bowl. Set aside.
- In a large bowl using a hand mixer or a stand mixer fitted with a paddle attachment, beat the butter and granulated sugar together on medium-high speed until creamed, about 3 minutes. Scrape down the sides and up the bottom of the bowl as needed. Add the egg, egg yolk, and vanilla extract and beat on high speed until combined, about 1 minute. Scrape down the sides and beat again as needed to combine.
- Add the flour mixture to the wet ingredients and mix on low speed until combined. Dough will be thick and sticky. Remove from the mixing bowl.
- Divide the dough in half. Place half of the dough back into the mixing bowl. Add the cocoa powder, milk, and espresso powder (if using). Beat on low speed until dough is combined.
- Form each dough into a 1-inch-thick rectangle block, about 4×5 inches in size. Wrap both dough blocks up and refrigerate for 60–90 minutes.
- Remove vanilla dough from the refrigerator and unwrap
- Lightly flour a piece of parchment paper and roll out the vanilla dough into an 8×14-inch rectangle. Refrigerate again if necessary.
- Roll the chocolate dough out to an 8×14-inch rectangle. Align the chocolate dough on top of the vanilla dough and flatten gently.
- Tightly roll the two doughs together from a long side, ensuring no gaps. Cut into two 7-inch-long logs.
- Wrap each log and refrigerate for 2 more hours or up to 4 days.
- Preheat oven to 350°F (177°C) and line baking sheets with parchment paper.
- Slice each log into 14 1/2-inch-thick cookies. Arrange cookies about 2 inches apart on the sheets.
- Bake for 14–15 minutes or until very lightly browned around the edges. Allow cooling on the baking sheet for 5 minutes before transferring to a wire rack.
- Coarsely chop the chocolate. Melt in a double boiler or microwave, stirring every 20 seconds until smooth. Dip half of each cooled cookie into the chocolate. Add sprinkles if desired.
- Allow chocolate to set completely at room temperature or in the refrigerator.
- Cookies stay fresh covered at room temperature for 1 week. Refrigerate cookies dipped in chocolate after a few days.
Notes
- You can use cocoa powder as your flour for handling and rolling the chocolate dough.
- If the dough is too warm, chill the cookies on the baking sheet for 10 minutes before baking.
- Prep Time: 30 minutes
- Cook Time: 15 minutes
- Category: Desserts
- Method: baking
- Cuisine: American
Nutrition
- Serving Size: 1 cookie


